Next.js Stripe Tutorial 2026: Payments with Claude Code
A complete Next.js Stripe tutorial for 2026: Checkout, webhooks, the Customer Portal, and testing — written for founders shipping with Claude Code or Cursor.
· Justin Boggs

Adding Stripe payments to a Next.js app in 2026 comes down to four pieces: a server-side checkout session, a webhook handler that syncs subscription state to your database, the Stripe Customer Portal for self-service billing, and the Stripe CLI for local testing. That's the whole architecture. The reason most tutorials make it feel harder is that they bury those four pieces under custom payment forms you don't need. This guide walks the entire integration end to end — and because I built Coding Capybaras without being able to write this code myself, it also covers how to get an AI assistant like Claude Code to do the wiring without painting you into a corner.
TL;DR
- Use Stripe Checkout, not a custom form. It's a hosted payment page — Stripe handles PCI compliance, mobile layout, tax, and localization.
- The webhook handler is the real integration. Checkout collects money; webhooks are how your app finds out and grants access.
- Read the webhook body with
req.text(), neverreq.json(). Signature verification needs the raw body. This one mistake causes most "my webhook won't work" threads.- Use the Stripe Customer Portal instead of building cancel/upgrade/invoice screens yourself.
- Test locally with the Stripe CLI (
stripe listen) and card4242 4242 4242 4242before you ever touch live mode.
What you're actually building (the four pieces)
Before you prompt an AI assistant or paste a single line of code, it helps to hold the whole shape of a Stripe integration in your head. There are exactly four moving parts, and they form a loop:
flowchart LR
    A[Pricing page] -->|"POST /api/checkout"| B[Checkout Session<br/>created server-side]
    B -->|redirect| C[Stripe-hosted<br/>Checkout page]
    C -->|payment succeeds| D[Webhook event<br/>to your route handler]
    D -->|verified + processed| E[(Your database:<br/>subscription state)]
    E -->|gates features| F[Your app]
    F -->|"Manage billing"| G[Stripe Customer Portal]
    G -->|changes fire events| D
Piece one is the Checkout Session. Your server (a Route Handler or Server Action — never the browser) calls Stripe's API with a price ID and gets back a URL. You redirect the customer there. The payment form itself lives on Stripe's domain, which means card data never touches your servers and PCI compliance is Stripe's problem, not yours. Stripe's own benchmarks claim hosted Checkout converts meaningfully better than typical custom forms — the DesignRevision integration guide cites up to 20% — because Stripe continuously optimizes it across millions of merchants.
Piece two is the webhook handler. When the payment succeeds, Stripe makes an HTTP request to a URL you control. That request — not the customer returning to your success page — is the moment your app should grant access. Customers close tabs. Redirects fail. The webhook always arrives.
Piece three is your database. You store a small mirror of Stripe's subscription state: customer ID, subscription ID, status, current period end. Stripe stays the source of truth; your database is a cache you read on every request to decide who sees what.
Piece four is the Customer Portal. Stripe hosts a full billing management UI — update card, switch plans, download invoices, cancel. You create a portal session server-side and redirect to it. Per the same integration guide, this eliminates the large majority of subscription-management UI you'd otherwise build and maintain yourself.
If you're still deciding whether Stripe is the right processor at all, I compared the options in Stripe vs Lemon Squeezy vs Paddle — the short version is that Stripe wins on flexibility and loses on tax handling, which you can buy back with Stripe Tax.
Setting up: keys, packages, and the one file that touches Stripe
The setup is genuinely five minutes. You need a Stripe account in test mode, two API keys, and one npm package on the server (stripe). If you use hosted Checkout — which you should — you don't even need the client-side @stripe/stripe-js package, because the "form" is just a redirect.
Your .env.local gets three values:
STRIPE_SECRET_KEY=sk_test_...
NEXT_PUBLIC_STRIPE_PUBLISHABLE_KEY=pk_test_...
STRIPE_WEBHOOK_SECRET=whsec_...
Two rules here that I'd treat as non-negotiable. First, the secret key is server-only — the NEXT_PUBLIC_ prefix is reserved for the publishable key, and if you ever see NEXT_PUBLIC_STRIPE_SECRET_KEY in AI-generated code, stop and fix it, because Next.js will happily bundle that into JavaScript any visitor can read. Second, .env.local never goes in a web form and never gets committed; it's in .gitignore for a reason.
The architectural rule that has saved me the most pain: import the Stripe SDK in exactly one file. In the Coding Capybaras boilerplate that file is /platform/lib/payments/stripe.ts, and every other piece of code goes through a payment abstraction instead of importing stripe directly. You don't need a boilerplate to copy the pattern — create lib/stripe.ts, instantiate the client once with a pinned apiVersion, and export it:
// lib/stripe.ts
import Stripe from "stripe";

export const stripe = new Stripe(process.env.STRIPE_SECRET_KEY!, {
  apiVersion: "2025-10-29.acacia",
  typescript: true,
});
Why one file? Because when you're working with an AI assistant, the single import point is a guardrail you can state in one sentence: "the Stripe SDK is only imported in lib/stripe.ts — everything else uses the exported client." Claude Code respects constraints like that extremely well, and it prevents the failure mode where the assistant sprinkles new Stripe(...) instantiations across six routes. I wrote more about giving assistants this kind of constraint in Claude Code for non-developers.
Pinning the API version matters too: Stripe ships new API versions regularly, and an unpinned client silently adopts behavior changes when you upgrade the package. Pin it, and upgrades become a decision instead of a surprise.
Creating the Checkout Session (the easy 20%)
Here's the entire server side of "accept a subscription payment." It's a Route Handler that creates a Checkout Session and returns the URL:
// app/api/checkout/route.ts
import { stripe } from "@/lib/stripe";
import { NextResponse } from "next/server";

export async function POST(req: Request) {
  const { priceId } = await req.json();
  // Validate priceId against your own allowlist before using it.

  const session = await stripe.checkout.sessions.create({
    mode: "subscription", // or "payment" for one-time charges
    line_items: [{ price: priceId, quantity: 1 }],
    automatic_tax: { enabled: true },
    allow_promotion_codes: true,
    success_url: `${process.env.NEXT_PUBLIC_APP_URL}/dashboard?session_id={CHECKOUT_SESSION_ID}`,
    cancel_url: `${process.env.NEXT_PUBLIC_APP_URL}/pricing`,
  });

  return NextResponse.json({ url: session.url });
}
On the pricing page, the button does a fetch to that route and sets window.location.href to the returned URL. That's it — no payment form, no card fields, no PCI scope. mode: "subscription" gives you recurring billing with trials, retries, and proration handled by Stripe; mode: "payment" is the one-time variant (it's how the $97 Coding Capybaras Pro purchase works — one-time pricing was a deliberate choice, but that's another post).
One real-world note on validation: don't pass arbitrary client-supplied priceId values straight into the session. Keep an allowlist of the price IDs you actually sell — in the boilerplate this is enforced with a Zod schema before any Stripe call, a pattern worth copying — otherwise someone can checkout against any price object in your account, including archived experiments.
While we're on price: Stripe's standard rate is 2.9% + $0.30 per successful card charge (Stripe's pricing page has the current numbers). The fixed 30 cents means your effective rate depends heavily on your price point — at $9 you're paying over 6%, at $97 you're near the headline rate:
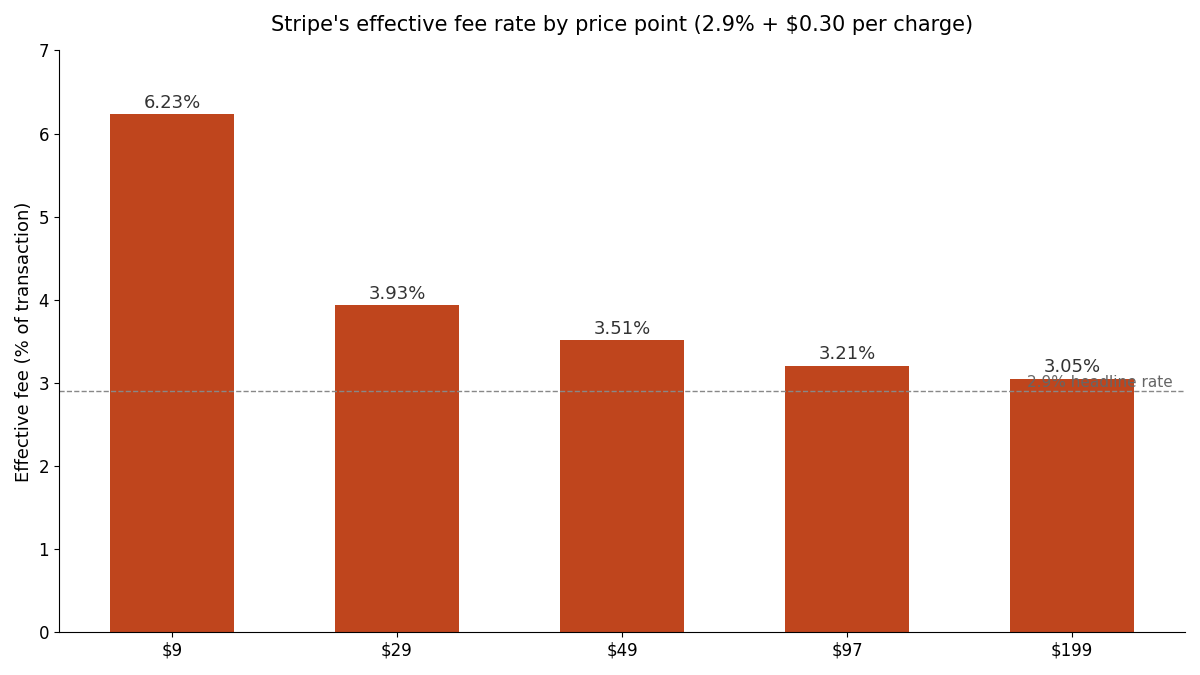
That curve is one of several reasons cheap monthly plans hurt indie SaaS more than founders expect — I dug into the pricing side of this in SaaS pricing for non-tech founders.
The webhook handler (the hard 80%)
Everything before this section is the part AI assistants get right on the first try. The webhook handler is where integrations actually fail, so slow down here.
The handler is a Route Handler at a fixed URL — Stripe needs a static endpoint to call. The skeleton:
// app/api/webhooks/stripe/route.ts
import { stripe } from "@/lib/stripe";
import { headers } from "next/headers";
import { NextResponse } from "next/server";

export const runtime = "nodejs"; // the stripe SDK needs Node, not Edge

export async function POST(req: Request) {
  const body = await req.text(); // RAW body — not req.json()
  const signature = (await headers()).get("stripe-signature");
  if (!signature) {
    return NextResponse.json({ error: "Missing signature" }, { status: 400 });
  }

  let event;
  try {
    event = stripe.webhooks.constructEvent(
      body,
      signature,
      process.env.STRIPE_WEBHOOK_SECRET!
    );
  } catch {
    return NextResponse.json({ error: "Invalid signature" }, { status: 400 });
  }

  // Idempotency: skip events you've already processed (store event.id).

  switch (event.type) {
    case "checkout.session.completed":
      // Grant access: look up/create the user, store customer +
      // subscription IDs and status in your database.
      break;
    case "invoice.paid":
      // Renewal succeeded: extend current_period_end.
      break;
    case "invoice.payment_failed":
      // Mark past_due; start your dunning emails.
      break;
    case "customer.subscription.updated":
    case "customer.subscription.deleted":
      // Sync status changes, including cancellations.
      break;
  }

  return NextResponse.json({ received: true });
}
Four rules make this production-grade rather than tutorial-grade. Verify the signature on every event — constructEvent does this, and it requires the raw request body, which is why await req.text() matters and req.json() breaks verification every single time. Process idempotently — Stripe delivers at-least-once and retries failures, so store each event.id and skip duplicates, or a retry storm double-fulfills orders. Return 200 fast — do slow work (emails, syncs) after acknowledging, or Stripe times out and retries, compounding the previous problem. Force the Node runtime — the stripe SDK doesn't run on Edge, and Vercel will route it there if your project defaults that way.
Those five webhook events — checkout.session.completed, invoice.paid, invoice.payment_failed, customer.subscription.updated, customer.subscription.deleted — cover essentially the whole subscription lifecycle. Stripe's webhook docs list the full catalog, but resist the urge to subscribe to everything; each handled event type is code you maintain.
I learned most of these rules by hitting them, and wrote up the complete set of failure modes — out-of-order delivery, dev/prod secret mixups, the 72-hour retry window — in Stripe webhook hell. If you only read one companion piece to this tutorial, make it that one.
Prompting Claude Code to do the wiring
If you're a non-tech founder, you're probably not typing the code above by hand — you're directing Claude Code or Cursor to write it. The difference between a clean integration and a mess is almost entirely in the constraints you give upfront. Here's the prompt structure that works:
Add Stripe subscription payments to this Next.js App Router project. Constraints:
- Use Stripe Checkout (hosted), not Elements or custom forms.
- The Stripe SDK is imported in exactly one file:
lib/stripe.ts. Pin the apiVersion.- Webhook handler at
app/api/webhooks/stripe/route.ts. Read the raw body withreq.text(), verify the signature withconstructEvent, forceruntime = "nodejs", and handle: checkout.session.completed, invoice.paid, invoice.payment_failed, customer.subscription.updated, customer.subscription.deleted.- Store subscription state in [your table]. Stripe is the source of truth.
- Validate all route inputs with Zod before calling Stripe.
- Use the Stripe Customer Portal for billing management — do not build cancel/upgrade UI.
- Secrets come from .env.local only. Never use NEXT_PUBLIC_ for the secret key.
Every line of that prompt exists because I watched an AI assistant get it wrong without it. Without line 1, you get a half-built Elements form. Without line 3, you get req.json() and an afternoon of "invalid signature" errors. Without line 6, you get four new pages of billing UI to maintain forever.
Then verify the output — not by reading every line, but by checking the constraints held: grep for new Stripe (should appear once), grep for req.json() inside the webhook route (should appear zero times), confirm the runtime export exists. This checklist-verification approach is the core of the workflow I described in the AI coding starter guide, and it's how a non-developer ships payment code with confidence. If you'd rather start from code where all of this is already wired and reviewed, that's precisely the gap the Coding Capybaras marketplace prompts and the boilerplate's payments module exist to fill — but the constraint-prompt above gets you there from scratch, too.
Testing locally with the Stripe CLI
You cannot meaningfully test webhooks by clicking around your app, because Stripe can't reach localhost. The Stripe CLI fixes this by opening a tunnel:
stripe login
stripe listen --forward-to localhost:3000/api/webhooks/stripe
stripe listen prints a signing secret starting with whsec_ — that goes in .env.local as your local STRIPE_WEBHOOK_SECRET. Note that this local secret is different from the one your production endpoint gets in the Stripe Dashboard; mixing them up is the classic "works locally, silently fails in prod" trap.
With the tunnel running, walk the real flow in test mode using Stripe's standard test cards:
| Card number | What it simulates |
| --- | --- |
| 4242 4242 4242 4242 | Successful payment |
| 4000 0000 0000 0002 | Card declined |
| 4000 0025 0000 3155 | 3D Secure challenge required |
| 4000 0000 0000 9995 | Insufficient funds |
You can also fire individual events without a checkout flow — stripe trigger invoice.payment_failed is the fastest way to confirm your dunning path actually marks the subscription past_due. The full test matrix worth running before launch: successful subscribe, declined card, cancel via the Customer Portal (confirm the webhook updates your database), and a request with a bad signature (confirm you return 400). Stripe's testing docs cover the longer tail of scenarios.
When everything passes, going live is three swaps: live API keys, a production webhook endpoint registered in the Dashboard (with its own signing secret), and live price IDs. Nothing in your code changes.
Frequently asked questions
Should I use Stripe Checkout or Stripe Elements?
Checkout, unless you have a hard requirement it can't meet. Hosted Checkout handles PCI compliance, mobile layout, localization, and tax automatically, and Stripe optimizes it for conversion across its whole network. Elements is for deeply embedded flows — mid-onboarding payment steps, dynamic pricing configurators — and costs you days of UI work that Checkout gives you for free.
Why does my webhook signature verification keep failing?
Almost always because the request body was parsed before verification. Stripe signs the raw bytes, so you must read the body with req.text() in the App Router and pass that string to constructEvent. The second most common cause: using the Dashboard webhook secret locally when stripe listen issued you a different one.
Do I need a database table for subscriptions?
Yes — a small one. Store the Stripe customer ID, subscription ID, status, price ID, and current period end, updated only by your webhook handler. Your app reads this table to gate features; Stripe remains the source of truth. Never store card numbers or prices in your own database.
How much does Stripe cost for a small SaaS?
The standard US rate is 2.9% + $0.30 per successful card charge, with add-ons like Stripe Tax billed per transaction. Because of the fixed 30 cents, the effective rate falls as your price rises — over 6% on a $9 plan, near 3% at $97 and up. Check Stripe's pricing page for current numbers and volume discounts.
Can I do one-time payments instead of subscriptions?
Yes — set mode: "payment" in the Checkout Session and listen for checkout.session.completed. You skip the renewal-related webhook events entirely, which makes one-time pricing meaningfully less code to maintain. It's a real argument for one-time pricing on indie products.
How do I let customers cancel or change plans?
Don't build it. Create a Stripe Customer Portal session server-side (stripe.billingPortal.sessions.create) and redirect the customer. The portal handles plan switches, payment method updates, invoice downloads, and cancellation; your webhook handler picks up the resulting customer.subscription.updated and customer.subscription.deleted events.
Conclusion
A Next.js Stripe tutorial in 2026 is really a webhook tutorial wearing a payments hat. Checkout Sessions are a dozen lines; the Customer Portal is three; the engineering substance is a webhook handler that verifies signatures against the raw body, processes events idempotently, and syncs state to a small subscriptions table that gates your features. Get those four pieces in place with the Stripe CLI proving each path locally, and you have billing infrastructure that holds up from your first test card to real customer money. If you'd rather start with all of it already wired — single-file Stripe import, signature-verified webhook handler, lifecycle events, and the Customer Portal — Coding Capybaras is the free boilerplate where I've already made these mistakes for you.