Upstash Rate Limit in Next.js: A Complete Setup Guide
How to add rate limiting to a Next.js app with Upstash Redis: install it, pick an algorithm, wire up middleware and route handlers, return headers, and test it.
· Justin Boggs

Photo by Jorge Avila on Unsplash
To add an Upstash rate limit to a Next.js app you need four things: a Redis database, two npm packages, a limiter object, and one line in the route you want to protect. The whole install is about fifteen minutes. What takes longer is the decisions around it — which algorithm, what identifier, where in the request path, and how to verify the thing actually works before you ship it. This post walks the full path: setup, the algorithm tradeoff, middleware versus route handler, the response headers, the serverless gotchas that will bite you, and how to test it locally without waiting a minute between attempts.
TL;DR
npm install @upstash/ratelimit @upstash/redis, create a Redis database, set two env vars. That's the setup.- Use
slidingWindowunless you have a reason not to. It costs slightly more thanfixedWindowand doesn't leak double-size bursts at window boundaries.- Create the limiter at module scope, not inside the handler. A per-request limiter defeats the in-memory cache and adds latency.
- On edge runtimes, pass the returned
pendingpromise towaitUntil()— otherwise analytics writes get cut off.- Test it with a loop, not by clicking. Ten
curls in aforloop tells you in two seconds what clicking tells you in five minutes.
Why Upstash for rate limiting on serverless
Rate limiting needs shared state. That's the whole constraint, and it's the reason this isn't a ten-line function you write yourself.
On a single long-running Node server, you could keep a counter in memory and be done. On Vercel, Netlify, or any serverless platform, your code runs in short-lived instances that don't share memory and come and go unpredictably. A counter in module scope is per-instance, which means a limit of "10 per minute" is really "10 per minute, per however many instances happen to be warm." That is not a limit. It's a suggestion.
So you need a store that every instance can reach, and reaching it has to be fast and cheap. That's where the standard answer runs into a second problem: a normal Redis client holds a TCP connection, and serverless functions are terrible at holding connections. You end up with connection storms, or a connection pooler you now have to operate.
Upstash solves this specific problem. @upstash/ratelimit is the rate-limiting library that talks to Redis over HTTP instead of TCP, which means it works in environments where a persistent socket isn't available — serverless functions, edge runtimes, Cloudflare Workers. The library's own README describes it as the only connectionless rate-limiting library, and that framing is accurate: HTTP is the feature.
It's not the only option. If you're already running Postgres and your traffic is modest, a counter table works. If you're on a persistent Node server, ioredis against any Redis is fine. If your host has a built-in WAF with rate limiting, use that for the coarse layer. Upstash earns its place specifically when you're serverless, need per-user granularity, and don't want to run infrastructure. That's the exact shape of most indie SaaS apps, which is why it shows up in this stack so often — and once you have a Redis database sitting there, it doubles as the store for the rest of your caching strategy.
Setup: database, packages, environment variables
Three steps, in order.
1. Create the Redis database. Sign in at console.upstash.com, create a Redis database, and pick the region closest to where your functions run. Region matters more than you'd think — every limit() call is a round trip, so a database in us-east-1 serving functions in iad1 adds single-digit milliseconds, while one in Singapore adds a couple hundred.
Copy the REST URL and REST token from the database page. Not the Redis connection string — the REST credentials. Those are what the HTTP client uses.
2. Install the packages.
npm install @upstash/ratelimit @upstash/redis
Two packages: the limiter and the HTTP Redis client it talks through.
3. Set the environment variables. In .env.local:
UPSTASH_REDIS_REST_URL="https://your-db.upstash.io"
UPSTASH_REDIS_REST_TOKEN="your-rest-token"
Those exact names matter. Redis.fromEnv() reads them by convention, which saves you from passing config around. Add the same two variables to your host's environment settings before you deploy — a missing token in production throws at request time, not build time, so it's easy to miss.
Never commit these. .env.local should already be in your .gitignore; run git status once and confirm it isn't listed before your next commit. If you haven't sorted out where secrets live across local and production yet, that's worth doing first — I covered the setup in environment variables and secrets management.
Creating the limiter (and where to put it)
Put the limiter in its own module. There are two reasons, and the second one is the one people miss.
// /product/lib/ratelimit/index.ts
import { Ratelimit } from "@upstash/ratelimit";
import { Redis } from "@upstash/redis";

const redis = Redis.fromEnv();

// 10 requests per 10 seconds, per identifier
export const apiLimiter = new Ratelimit({
  redis,
  limiter: Ratelimit.slidingWindow(10, "10 s"),
  analytics: true,
  prefix: "rl:api",
});

// Tighter limit for authentication routes
export const authLimiter = new Ratelimit({
  redis,
  limiter: Ratelimit.slidingWindow(5, "10 m"),
  analytics: true,
  prefix: "rl:auth",
});

// Expensive AI endpoint
export const aiLimiter = new Ratelimit({
  redis,
  limiter: Ratelimit.tokenBucket(5, "1 m", 10),
  analytics: true,
  prefix: "rl:ai",
});
The first reason for a shared module is obvious: you'll want several limiters with different ceilings, and you want them defined in one place where you can see them next to each other.
The second reason is performance. Create the limiter at module scope, not inside your handler. The library keeps an in-memory cache while the function instance stays warm, so repeat callers can be rejected without a Redis round trip at all. Construct a new Ratelimit on every request and you throw that cache away every time.
Note the prefix on each one. Every limiter writes keys into the same Redis database, and without distinct prefixes your auth limiter and your API limiter share counters — which produces the most confusing class of bug, where hitting one endpoint locks you out of an unrelated one. The default prefix is @upstash/ratelimit; override it per limiter.
Which algorithm should you pick?
Upstash ships three, and the algorithms documentation is honest about the tradeoffs. Here's the short version.
| Algorithm | How it works | Cost | Best for |
| --- | --- | --- | --- |
| fixedWindow | Counter per fixed time slice, resets at the boundary | Cheapest | High-volume routes where a boundary burst doesn't matter |
| slidingWindow | Weighted average of the previous and current window | Medium | Almost everything — this is the sensible default |
| tokenBucket | Bucket refills at a fixed rate; each request takes one token | Most expensive | Bursty traffic you want to smooth, or a large initial burst allowance |
Fixed window is the cheapest to compute and store, and it has one specific flaw: because the counter resets hard at the boundary, a caller can spend their full allowance at the end of one window and their full allowance at the start of the next. With a limit of 10 per minute, that's 20 requests in a couple of seconds.
Sliding window fixes that by weighting the previous window's usage as it ages out. Upstash documents the approximation directly. With a limit of 10 per minute, 4 requests in the previous window, 5 in the current one, and 15 seconds elapsed:
rate = 4 * ((60 - 15) / 60) + 5 = 8
8 < 10, so the request passes
Plot that decay and you can see exactly what the fixed window gives away:
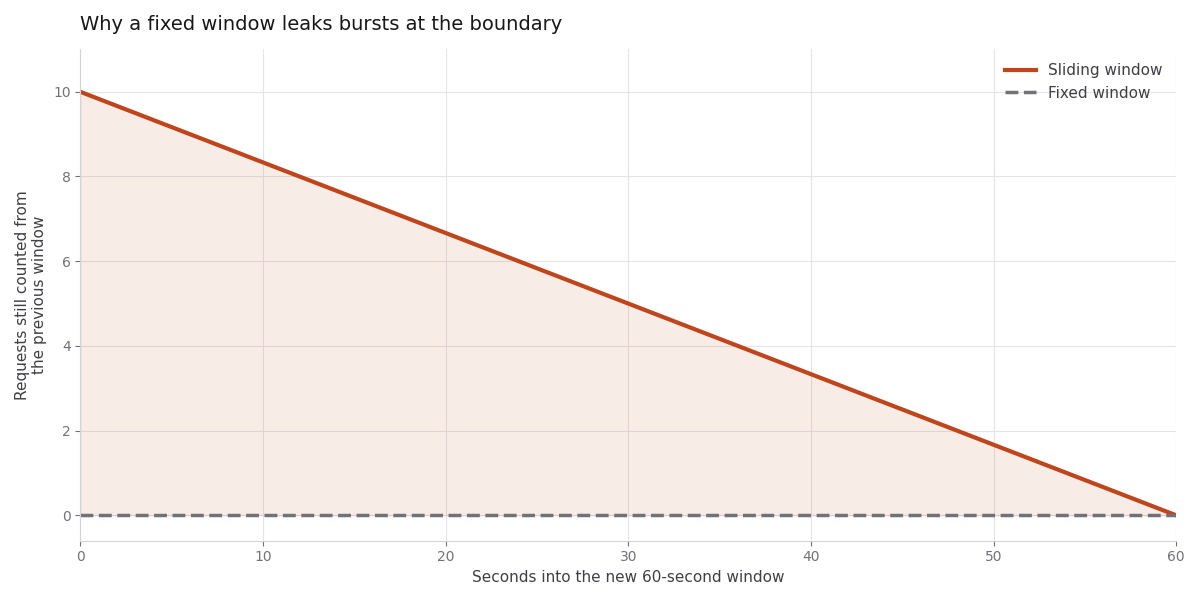
Illustration computed from the sliding-window formula in Upstash's algorithm documentation. Ten requests used in the previous window, none yet in the current one.
The gray line is the fixed window: at the instant the boundary passes, everything you did a second ago stops counting. The orange line is the sliding window: your previous usage fades out over the full period instead of vanishing.
The documented cost of sliding window is more storage and more computation, and the result is an approximation — it assumes requests in the previous window were spread evenly, which they may not have been. In practice that approximation is fine, and the boundary fix is worth the cost. Use slidingWindow unless you're limiting something extremely high-volume where the Redis cost matters more than boundary precision.
Token bucket is the odd one out. Rather than a window, it's a bucket of maxTokens that refills at refillRate per interval. Ratelimit.tokenBucket(5, "1 m", 10) refills 5 tokens a minute up to a ceiling of 10. That shape — a burst allowance larger than the sustained rate — is exactly right for AI endpoints, where a user might legitimately fire several requests while iterating and then go quiet for ten minutes. It's the most expensive to compute, so use it where the shape matters.
One documented quirk worth knowing: for fixed and sliding window, the reset timestamp is based on fixed clock boundaries, not on when the caller's first request arrived. Two requests made right before a window ends both count against the current window.
Where to put the check
Two places, for two different kinds of route. Middleware handles anything before sign-in; route handlers handle everything after.
Middleware, for routes with no user yet
Middleware is the right place for limits on sign-in, sign-up, password reset, and public forms. The identifier is the IP address, because that's all you have.
// middleware.ts (repo root)
import { NextResponse } from "next/server";
import type { NextRequest } from "next/server";
import { authLimiter } from "@/product/lib/ratelimit";

export const config = {
  matcher: ["/api/auth/:path*", "/api/contact"],
};

export async function middleware(request: NextRequest) {
  const forwarded = request.headers.get("x-forwarded-for");
  const ip = forwarded?.split(",")[0]?.trim() || "127.0.0.1";

  const { success, limit, remaining, reset } = await authLimiter.limit(ip);

  const headers = new Headers({
    "X-RateLimit-Limit": limit.toString(),
    "X-RateLimit-Remaining": remaining.toString(),
    "X-RateLimit-Reset": reset.toString(),
  });

  if (!success) {
    const retryAfter = Math.ceil((reset - Date.now()) / 1000);
    headers.set("Retry-After", retryAfter.toString());

    return NextResponse.json(
      {
        error: "rate_limit_exceeded",
        message: `Too many attempts. Retry in ${retryAfter} seconds.`,
        retry_after: retryAfter,
      },
      { status: 429, headers },
    );
  }

  const response = NextResponse.next();
  headers.forEach((value, key) => response.headers.set(key, value));
  return response;
}
Three details in there are load-bearing.
Read the IP from x-forwarded-for, and take the first entry. Behind a proxy or CDN the header is a comma-separated chain and the leftmost value is the original client. Grabbing the whole string means every distinct proxy path gets its own bucket, which quietly halves the effectiveness of the limit.
Set the headers on success too, not just on rejection. A client that can see X-RateLimit-Remaining: 2 can slow down on its own. This is the convention GitHub's REST API follows, and tooling recognizes it.
Compute Retry-After from reset. The reset field is a Unix timestamp in milliseconds, and Retry-After is in seconds. Subtract, divide, round up. Getting this backwards produces a header telling clients to wait until 1970, which they interpret as "retry immediately."
Route handlers, for authenticated routes
Once you're past authentication, limit by user ID instead of IP. Same call, better identifier.
// app/api/generate/route.ts
import { NextResponse } from "next/server";
import { aiLimiter } from "@/product/lib/ratelimit";
import { getCurrentUser } from "@/platform/lib/auth";
import { z } from "zod";

const bodySchema = z.object({
  prompt: z.string().min(1).max(4000),
});

export async function POST(request: Request) {
  const user = await getCurrentUser();
  if (!user) {
    return NextResponse.json({ error: "unauthorized" }, { status: 401 });
  }

  const { success, limit, remaining, reset } = await aiLimiter.limit(
    `user:${user.id}`,
  );

  if (!success) {
    const retryAfter = Math.ceil((reset - Date.now()) / 1000);
    return NextResponse.json(
      {
        error: "rate_limit_exceeded",
        message: `Limit of ${limit} requests reached. Retry in ${retryAfter}s.`,
        retry_after: retryAfter,
      },
      {
        status: 429,
        headers: {
          "Retry-After": retryAfter.toString(),
          "X-RateLimit-Limit": limit.toString(),
          "X-RateLimit-Remaining": remaining.toString(),
          "X-RateLimit-Reset": reset.toString(),
        },
      },
    );
  }

  const parsed = bodySchema.safeParse(await request.json());
  if (!parsed.success) {
    return NextResponse.json({ error: "invalid_body" }, { status: 400 });
  }

  // ...expensive call goes here
  return NextResponse.json({ ok: true });
}
Order matters here: rate limit check first, body validation second, expensive work last. The limiter is the cheapest gate you have, so it should be the first one a request meets. If you validate a 4,000-character body before checking the limit, you've done work on a request you were always going to reject.
Namespace your identifiers — user:${user.id}, not the bare ID. It costs nothing and it saves you when you later add apikey: or team: limiters and want to read the Redis keyspace without guessing. If you've shipped customer-facing API keys, the key ID is the identifier you want on those routes, and the plan attached to it decides which limiter runs.
The serverless gotchas
Four things that bite people, in rough order of how much time they'll cost you.
The pending promise on edge runtimes. When analytics: true is set, or you're using the multi-region setup, the library does some work after returning the limit decision. On Vercel Edge and Cloudflare Workers, the runtime kills your function the moment you return a response — cutting that work off mid-flight. The limit() response includes a pending promise for exactly this:
const { success, pending } = await apiLimiter.limit(identifier);
context.waitUntil(pending);
You'll see this as analytics that mysteriously undercount, not as an error.
Env vars missing in production. Redis.fromEnv() throws when the variables aren't set, and it throws at request time. Set both variables in your host's dashboard as a separate step from your local .env.local, and hit the protected route once after your first deploy.
Latency you didn't budget for. Every uncached limit() call is a network round trip. Put the Redis database in the same region as your functions, and don't call the limiter on routes that don't need it — a matcher that catches every path adds a round trip to your static pages for no benefit.
Fail-open or fail-closed? If Upstash is unreachable, limit() rejects. Wrap it. For most routes you want to fail open — let the request through rather than take your app down because a rate limiter is having a bad day:
let allowed = true;
try {
  const result = await apiLimiter.limit(identifier);
  allowed = result.success;
} catch (error) {
  console.error("ratelimit_unavailable", error);
  allowed = true; // fail open
}
The exception is anything that spends money. On an endpoint that calls a paid API, failing open means an outage in your rate limiter becomes an unbounded bill. Fail closed there, and say so in the error message.
Testing that it actually works
Do not test this by clicking. Clicking a button ten times tells you almost nothing and takes five minutes.
Loop it with curl:
for i in $(seq 1 15); do
  curl -s -o /dev/null -w "%{http_code} " \
    -X POST http://localhost:3000/api/generate \
    -H "Content-Type: application/json" \
    -d '{"prompt":"hello"}'
done
echo
You want output like 200 200 200 200 200 429 429 429 .... If it's all 200, either the limiter isn't wired in or every request is hitting a different identifier. If it's all 429 from the first request, your window or limit arguments are probably swapped.
Check the headers on a single call:
curl -si -X POST http://localhost:3000/api/generate \
  -H "Content-Type: application/json" \
  -d '{"prompt":"hello"}' | head -20
Confirm X-RateLimit-Remaining decrements across calls and that Retry-After on a 429 is a small positive number of seconds.
Test the identifier, not just the limit. The bug that survives testing is keying on the wrong thing. Log the identifier on every call during development. If you're limiting an authenticated route and the log shows IP addresses, you'll discover it the day a customer's whole office gets locked out. If you're limiting sign-in and the log shows undefined, every anonymous visitor shares one bucket.
Reset between test runs so you're not waiting out a window:
await apiLimiter.resetUsedTokens(`user:${testUserId}`);
That's a real method on the limiter, and it's the difference between a tight test loop and sitting on your hands for ten minutes.
Frequently asked questions
Does Upstash rate limiting work on the Vercel Edge runtime?
Yes — that's the primary use case. The library communicates over HTTP rather than a TCP socket, which is what makes it work in edge and serverless runtimes at all. The one edge-specific requirement is passing the returned pending promise to context.waitUntil() so background analytics work isn't cut off when your response returns.
How much does this cost to run?
Upstash bills per Redis command, and each limit() call costs a small number of commands depending on the algorithm — fixed window is cheapest, token bucket is most expensive. The in-memory cache on warm instances means repeat rejections often cost zero commands. For a typical indie SaaS, this lands in free-tier or single-digit-dollar territory, but check the current pricing rather than trusting a number in a blog post.
Can I use one Redis database for rate limiting and caching?
Yes, as long as you set distinct key prefixes so the namespaces don't collide. The prefix option exists for exactly this. The consideration is eviction policy: if your cache usage fills the database and keys start getting evicted, your rate-limit counters can get evicted too, which silently resets limits.
What identifier should I use for unauthenticated routes?
The client IP, read from the leftmost value of x-forwarded-for. It's imperfect — shared networks and NAT mean many users can share one address — but it's the only identity available before sign-in. On auth routes specifically, run a second limiter keyed on the submitted email address as well, so a distributed attempt against one account still gets caught.
Should I return 429 or just fail silently?
Always return 429 with a Retry-After header. HTTP clients and libraries have built-in handling for that status code and will back off automatically. A silent failure or a 200 with an error body means every client retries immediately in a tight loop, which is the opposite of what you want from a rate limiter.
How do I stop a single user from burning my whole API budget?
A request limit alone won't do it, because requests aren't uniform in cost — one LLM call can be a thousand times more expensive than another. You need a second check that counts the expensive unit (tokens, emails, bytes) against a per-account budget, evaluated before the downstream call. That budget check is a separate limiter from this one, and the companion architecture post linked at the end covers how the two fit together.
Wrapping up
The mechanical part of adding an Upstash rate limit to Next.js is genuinely small: two packages, a limiter module, and one call at the top of each protected handler. Most of the work is in the decisions around it — sliding window over fixed window, user ID over IP once you're past authentication, headers on success as well as failure, and a deliberate choice about whether to fail open or closed.
Test it with a loop before you ship it, and log the identifier for the first week so you find out early if you're bucketing on the wrong thing.
If you want the layer above this — which limits belong at the edge versus in middleware versus in the route handler, and how to cap spend rather than requests — I wrote that up separately in where rate limits belong in your SaaS stack. The pattern in this post is also what protects the LLM route in the OpenAI and Anthropic API tutorial, and the Upstash Redis integration guide on Coding Capybaras has the copy-paste prompt to wire the whole thing into a Next.js, Supabase, and Stripe app.